Continued from Part 2
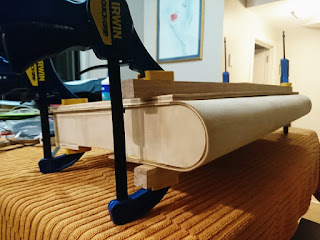
The very literal "make or break" part of this project was always going to be in curving the plywood skin over the skeleton. A 50mm curve is pretty tight for 3mm ply, and the risk of splitting is very real. But after an overnight soak in the bath tub, and fifteen minutes of slowly forming the bend, i managed to get it tight against the ribs and clamped down.
I love how well the softness of the curve has turned out. The case looks utterly seamless, and with the slight overhangs reminds me of a book. Maybe it's a play-book? *crickets*
The ply takes about a day to dry out, but once done it's ready to trim and glue.
That down time on the case meant it was time to do the wiring, aka the boring bit.
Looks messy, but it's not easy to solder to carbon coated terminals! I scraped the pads until I saw copper, soldered to it, then encased the assembly in araldite to secure the connections (after testing!).
Major point of information: DO NOT REMOVE THE ANALOGUE STICKS!
In the back of my head i knew this, but i cut them off anyway. When testing the controls, the non-existent analogue stick would start to provide inputs. This is because the potentiometers are self-calibrating, they need to be present (or at least virtualised somehow) to maintain their zero point.
Because i left the tails of the flex connector intact, it wasn't a big problem to reconnect. Annoying, though!
I made common grounds for each of the rows of buttons, daisy chaining the spade connectors to keep it tidy. The whole lot will be fed through a couple of conduit wraps to for some semblance of order.
But as in life, it's actually what's on the outside that counts. Before finally gluing the curved sheet the outer end caps need to go on first.
This final gluing will take over twelve hours to be fully cured, but we're entering the home stretch. Stay tuned for Part 4.


Can you post the "electrical" part of the project? I mean where do every cable goes soldering with what ;D
ReplyDeleteMany thanks.
Will do! My next post will cover it all, I just need some time to put it together.
Delete