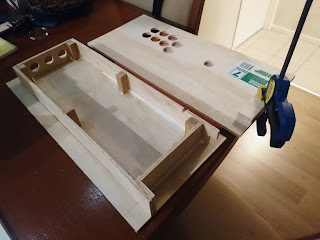
Since the previous entry i've decided to optimise the build slightly, shedding the two separate wiimote bulkheads by integrating them into the front and back "wall" sections. Two fewer pieces, much improved!
Here's the panel layout with all of the pieces cut:
- Top and bottom panels are sized as per the internal dimensions of the frame, around 500mm x 230mm.
- Front and back wall sections are 30mm shorter, with the back wall having a square notch for the wiimote connector, and a notch in the top for the wire to pass through. 50mm high to accomodate for the wiimote and frame overhang.
- Side walls are 74mm shorter than the width of the top/bottom panels, with the right side having three 24mm holes for the -/home/+ buttons. This allows for the 30mm indent AND the thickness of the front and back walls.
- The two 150mm x 30mm pieces on the left are the spacers for the wiimote, and are fixed in a stack to the inside of the top panel.
- The small 50mm x 30mm pieces in the middle are used as spacers to keep the wiimote snug, and are fixed to the front wall to make unplugging the wiimote easier. One of them is a bit of 3mm ply i had lying around as i needed 10mm of filler.
- There are six 18mm x 18mm x50mm pieces of oak to act as anchors for screwing the top panel down to the rest of the unit. This will allow for access to the internals and keep the whole thing rigid. I had some lying around, but they could be substituted for triangular gussets if you wanted to source the whole job from the one sheet of plywood.
Here are the walls being clamped in place. I needed a fifth clamp because one of the walls had a bow in it, and my button placement in the top panel was dangerously close to interfering. The 24mm Sanwa buttons are installed just for fun.
Once the walls were cured i could install the oak anchors. With the clamps off i also had a spare to glue the wiimote spacer stack to the inside of the top panel. The plywood spec sticker is still there partly to help me remember which one i bought for this build blog, and partly because it wouldn't come off easily and i'm lazy.
You can see the notches for the wiimote connector in the back wall here, and the vertical spacer glued to the inside of the front wall.
Once it wall all lined up, i could drill the holes in the top panel. I put the countersink tapers in by fitting a big drill bit, reversing the direction of my drill, and applying pressure. That way it can't bite and disappear through the thin panel!
Four small bolts hold the Sanwa JLF in place, the heads flush with the plywood surface. All of the screw heads will be hidden underneath the art decal.
Here i've just chucked the buttons in to get a feel for the layout. They're colour-coded in columns to match the Pokken Tournament dual-button movesets (grab/counter/super/null). I went with the Vewlix layout to try something "popular", but i'll probably return to my rotated Sega Player 2 setup in the future as it's super ergonomic. The top panel is a cinch to change!
I love that floating look still.
This is how the end button setup looks. They're recessed but easily reached, and it sorta feels like playing a pinball machine when you go for them.
And the other side holds the wiimote. You can get to all of the buttons, but it can't fall out due to being "trapped" by the overhanging frame.
In the next part i'll give the case a paint, cut the holes in the styrene sheet (do not try to drill styrene!), and lay down some art. I'm still waiting on a few classic controller pro's to turn up so i can gut them for their PCB's, so the electronics will have to be left for last.


No comments:
Post a Comment